Searching for Historical On-Call Assignments
A search for all of the on-call assignments that occurred in the past can be done by searching for a specific time period. The default time period has a start date of a month earlier than the current date, and the current date as the end date. The default period covers 30 days. For example, if the current date is September 14, the default start date for the search is August 14 and the default end date is September 14.
The search time period can be changed from the default time period. When choosing a time period, the start date and time must be entered. The search results are displayed in the Search Results section, and include any on-call group that the user is allowed to view. An on-call group with an on-call assignment scheduled during that time period displays in blue.
The on-call assignments for a person, function, an on-call group, or a combination of both for a specific time period can be displayed. This limits the search results even further than when just using a time period.
1. Access Smart Web.
2. Choose the On-Call tab.
3. Choose the History tab. The log in screen displays if the user has not previously logged in. Once the user has logged in, the History screen displays. The default date period is a 14-day period ending on the current date and beginning 14 days prior. All on-call groups to which the user has access are listed in the Search Results section, and the on-call groups that had assignments scheduled for that time period display in blue.
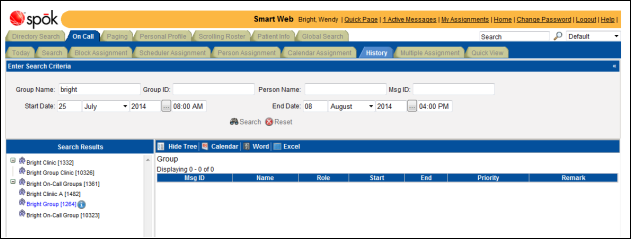
4. The start and end dates can be changed from the defaults.
a. In the Start Date fields, manually enter a new date. You can also click the calendar button to select a date from a calendar.
b. In the Start Date time field, enter a new time. Be sure to specify AM or PM. The time format is HH:MM AM.
c. In the End Date fields, manually enter a new date. You can also click the calendar button to select a date from a calendar.
d. In the End Date time field, enter a new time. Be sure to specify AM or PM. The time format is HH:MM AM.
e. If you need to revert to the original date and time settings, click the Reset button.

f. Click the Search button to update the on-call group display in the Search Results screen.
g. Click on an on-call group displayed in blue to display the on-call assignments for that group for the time period specified.
5. An on-call group can be searched for by on-call group name, by on-call group ID, or by both. Enter a partial or full on-call group name in the Group Name field, a partial or full on-call group ID in the Group ID field, or both. Using both fields further limits the search results.
a. Enter the search criteria in the Group Name and/or the Group ID fields.
b. Click the Search button to update the on-call group display in the Search Results screen.
c. Click on an on-call group displayed in blue to display the on-call assignments for that group for the time period specified.
6. A person can be searched for by name, by messaging ID, or by both. Enter a partial or full name in the Person Name field, a partial or full messaging ID in the Messaging ID field, or both. Using both fields further limits the search results.
Note that the format for the Person Name field when searching for a person is <Last Name, First Name>.
a. Enter the search criteria in the Person Name and/or the Messaging ID fields.
b. Click the Search button to update the on-call group assignments for the specified individual(s) for the time period specified. Note that the assignments display as a list.
7. The following actions can be performed on the on-call assignments listed in the screen. Depending on whether you searched for a person, not all of these options are available. Note that these options work the same in the History screen as in the Search screen.
• Hide Tree/Show Tree Button: Click the Hide Tree button to hide the Search Results section. The Hide Tree button toggles to the Show Tree button, which is clicked to re-display the Search Results section. For an example, please refer to Hiding the Search Results List.
• Calendar/Scheduler Button: Click the Calendar button to display the on-call assignments is a calendar format. The Calendar button toggles to the Scheduler button, which is clicked to re-display the assignments in the list format. For an example, please refer to Viewing the On-Call Assignments in a Calendar Format.
• Word Button: Click the Word button to save the on-call assignments as a Word document. For more information, please refer to Saving a Schedule of Assignments as a Word Document.
• Excel Button: Click the Excel button to save the on-call assignments in as an Excel spreadsheet. For more information, please refer to Saving a Schedule of Assignments as an Excel Spreadsheet.