Scheduling Multiple Assignments
Multiple assignments can be scheduled for more than one individual at a time using the Multiple Assignments screen. The same on-call assignment is scheduled for all of the selected individuals.
The process of making multiple scheduling assignments starts with selecting one or more on-call groups. The individuals that should be scheduled to be on-call can be selected from the members of the specified on-call groups. In addition, any individual that meets the paging requirements can be included.
The person can receive a page if the following conditions are met:
• The individual must be assigned a pager.
• The individual’s status must allow them to receive a page.
• The On Pager option must be selected in the Messaging tab in the Listings form in Smart Center.
• Paging for Smart Web must be enabled in the Module Access tab in the Listings form in Smart Center.
The scheduled assignments can be reviewed in the paging Search screen by searching for the on-call group or the person.
Selecting a Role or Title
Your system may be configured to select a role, or a title, for each assignment made. The list of roles is derived from the roles created for an on-call group. If you select one on-call group, the roles assigned to the selected group display in the Role list box.
If you select more than one on-call group, roles will be available in the Role list box only if the roles assigned to the groups overlap. For example, if all of the selected groups have a role called “Emergency” then that role is available in the Role list box.
Note that you cannot select a different role for each person. All of the schedule assignments will be assigned the same role.
1. Access Smart Web.
2. Choose the On-Call tab.
3. Choose the Multiple Assignment tab. The log in screen displays if the user has not previously logged in. Once the user has logged in, the Multiple Assignment screen displays.
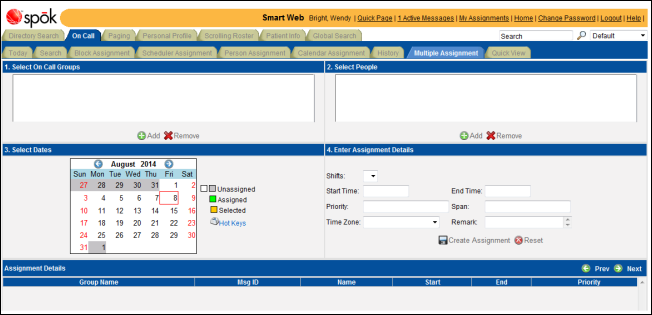
4. Select an on-call group in the Select On Call groups section.
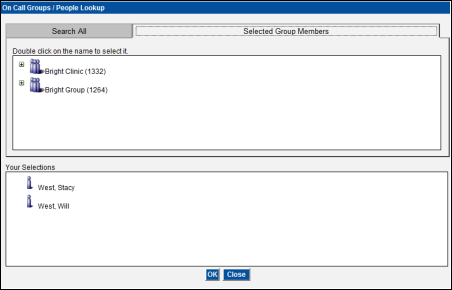
a. Click the Add button in the Select On-Call Groups section to select an on-call group. The On Call Groups/People Lookup screen displays.
b. Double-click on the name of an on-call group with which the assignment should be associated. The name displays in the Your Selections section.
c. Repeat the process to select additional on-call groups. Click the plus sign icon next to the name of an on-call group to display the associated on-call groups.

d. Click the OK button to save the selections. The selections display in the Select On Call Groups section.

e. You can remove an on-call group from the list by selecting the on-call group in the list and clicking the Remove button.
5. Individuals can be selected in the Select People section. Click the Add button in the Select People section to select the people and functions which should be scheduled for an on-call assignment. The On Call Groups/People Lookup screen displays.
The user can either select a member of the selected on-call groups, or can search for any person or function that can be paged.
Selecting an On-Call Group Member
a. Click the Select Group Members tab to display the selected on-call groups.
b. Click on the plus sign icons next to the names of the on-call groups to display a list of the members.
c. Double-click on the name of an on-call group member. The name displays in the Your Selections section.
d. Repeat the process to select additional on-call group members.
Selecting a Non-Member
a. Any person or function that can be paged can also be scheduled for the same on-call shift.
b. Click the Search All tab. Any current selections display in the Your Selections section.
c. Search for a person or function by entering a full or partial messaging ID, first name, or last name in the Msg ID, First Name, or Last Name fields. Entries can be made in any combination of fields.
d. Click the Search button. The people and functions that match the search entries display in the search results section.
e. Double-click on a name in the search results section. The name displays in the Your Selections section.
f. Repeat the process until all person and function selections have been made.

6. When all selections have been made, click the OK button in the On Call Groups/People Lookup screen. The selections display in the Selected People screen.
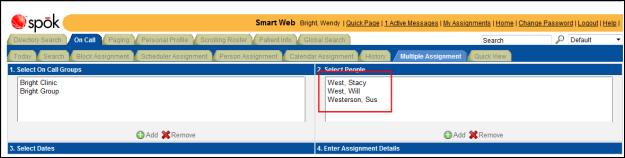
7. A person or function can be removed from the Selected People section. Select name in the Selected People section, then click the Remove button.
8. The dates on which you want to assign a shift can be selected in the calendar displayed in the Select Dates section.
a. Scroll to the month in which you want to create an assignment. The current month displays by default. Dates that currently have an assignment display in green.
b. Click on a date in the calendar. When selected, the date turns orange.
You can select more than one day by pressing and holding <CTRL> as you click on dates. You can also select a series of days by pressing and holding the <SHIFT> key and clicking on two different dates. All of the dates between the first and second selected dates are selected.
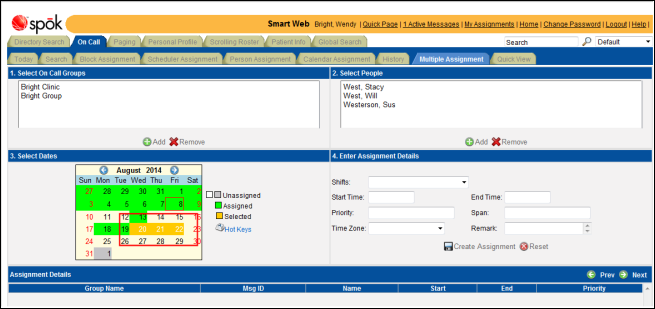
9. The start and end date and time for the on-call shift can be specified. You can manually choose dates or select a pre-determined shift.
Selecting a Shift
Select a previously created shift for the on-call group from the Shifts list box. The fields in the Enter Assignment Details section are populated with the shift information.
Manually Entering a Shift
a. In the Start Time fields, enter the time the on-call assignment should begin.
b. In the End Time fields, enter the time the on-call assignment should end.
c. In the Start Date field, enter the date on which the assignment should begin. The date format is MM/DD/YY. Click on the calendar button next to the field to select a date using the calendar.
d. In the End Date field, enter the date on which the assignment should end. The date format is MM/DD/YY. Click on the calendar button next to the field to select a date using the calendar.
10. Enter the priority for the shift assignment in the Priority field. The field is populated with the shift priority by default, if a priority was assigned to the shift.
By default, the shift assignment is given the same priority as that assigned to the shift. If you want to change the priority for the shift assignment, change the entry in the Priority field. The priority displays in the calendar.
The shift assignment priority is used when more than one individual is on-call for the same time. The person or function with the highest priority is paged. The highest priority is “1”. If more than one individual is assigned to the same time but priorities are not assigned, the first person or function in the list is paged.
11. In the Span field, enter the number of days the assignment should span. A span is the number of times midnight is crossed. In this example, if the Span field is left blank, four assignments will be scheduled: an assignment from 8:00 to 6:00 on May 1, May 2, May 3 and May 4. If a span of two is entered, an assignment will be created that starts at 8:00 AM on May 1 and ends at 6:00 PM on May 3.
The shifts created are assigned to each person selected.
12. From the Time Zone list box, select a time zone.
13. From the Role list box, select a role that describes the person’s job function.
NOTE: This is a configurable field and may not be available in your system.
If you select one on-call group, the roles assigned to the selected group display in the Role list box.
If you select more than one on-call group, roles will be available in the Role list box only if the roles assigned to the groups overlap. For example, if all of the selected groups have a role called “Emergency” then that role is available in the Role list box.
Note that you cannot select a different role for each person. All of the schedule assignments will be assigned the same role.
14. Enter any comments about the assignment in the Remark field.

15. Click the Create Assignment link to create the assignments. A message dialog displays.
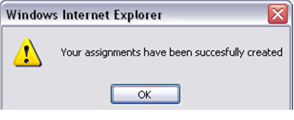
16. Click the OK button to close the message dialog and complete the process. The assignments display in the Assignment Details section.
• Click the Prev and Next buttons in the Assignment Details section to scroll through the assignments.
• Click a date show in green on the calendar to display the assignments for that day in the Assignment Details section.
